Using LabelWizPro for Sesame 2.0
These are instructions for using the LabelWizPro
designer to create/design/customize mailing/shipping labels for use with your Sesame
2.0 or later applications. For LabelWiz installation/setup instructions and an easy
tutorial on using LabelWiz, click the
LabelWiz Setup button on the LabelWiz form.
LabelWiz helps you quickly and easily design mailing label
templates that you can link to any form in any Sesame application to print mailing and
shipping labels, ID/name badges, and the like. You don't need
an external program. LabelWiz does it all — right from inside Sesame.
LabelWiz works with US Letter size and
international A4 portrait-oriented label sheets.
It's not for dedicated label devices like the DYMO, Seiko and Brother labelers. It's
not an envelope printer.
What's new in
LabelWizPro?
So many new features have been added to enhance label
design and functionality that we changed the name to LabelWizPro. Here's
a brief rundown of what's new:
- LabelWizPro takes advantage of Sesame 2.0's
powerful XResultSet technology to print labels. Records don't
show on screen like a running mass update. Instead, they're and printed transparently in the background. Printing
Queued labels, and optionally automatically un-queuing them, is now easier and faster.
- Each label line can now be individually fonted (any font
in your system), sized (from 6 to
40 points), styled (bold, italic, all caps, underline or any
combination), aligned (left, right or center),
custom-spaced and colored, giving you more control over the
appearance of your labels and supporting highly
sophisticated label designs. Now even complex and colorful name tags
and conference badges can be designed and printed with LabelWiz.
- You can now add decorative graphic lines to your labels in virtually any
position and thickness.
- New options make it easier to have LabelWiz close up empty lines and spaces.
- Three new options have been added to deal with lines that are
too long to fit the label width. Auto-Downsize reduces the font size of the line until
it fits. Auto-Truncate truncates the line to fit. Auto-Prompt
lets you edit the long line, on-the-fly, so you can change a
lengthy line like Manager, Equal Employment Opportunity
Compliance Section to something shorter as your
labels are being printed.
- There's a new Shift Image Right control on the Options
tab you can use to move an image to the right. This lets you, for
example, vertically center the image on the label or slide it all
the way over to the right.
- More barcoding options have been added. For PostNet barcoding, the ZIPCode
field doesn't have to be the last merge field on the label. And barcodes
other than PostNet are supported.
- Two new tabs — Use ASCII and Use Database —
have been added to the LabelWiz design screen. Use
ASCII lets you print labels right from the Label Designer
using most any delimited ASCII (export) file as your data source. The Use
Database
tab lets you sort and print labels for selected records in any
database in any Sesame application by mapping the
database's fields to your LabelWiz merge fields. These
powerful new options mean you don't have to add the LabelWiz
programming and print button to all the forms from which you want to
print labels. You can optionally do all your label printing
right from the same LabelWiz interface where you
design your labels.
- Other internal enhancements, such as a much higher positioning
and printing density,
provide more accuracy and sharper label text.
- LabelWizPro imports your old LabelWiz
label definitions and upgrades them to the new format.
|
LabelWizPro's
Screens
[If the images below do not display in your
browser, you can view them at
www.insidesesame.com/labelwizpro.htm]
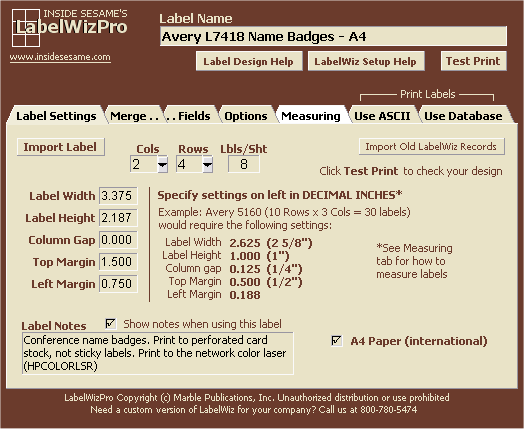
The Label Settings tab
Label Name
Assign a unique name to each label definition. The Label Name should describe
the type of label (such as Avery 5160), the number of labels per sheet (30 Up,
for example) and optionally the application and/or form that it is designed for (such as
Contacts). If you will be accessing your label definitions from different applications
or forms with differently-named elements, add the application name and/or form name as
part of the Label Name. The Label Name is what will appear on your pop-up
menu when you click the Print Label button on your form, so you want to be sure you're
selecting a label with the correct layout elements for that form.
The Buttons
There are three buttons near the top of the LabelWiz form. Here's what
they do:
- Label Design Help — Displays this document.
- LabelWiz Setup — Click this button for information on the options you
have for setting up (configuring) LabelWiz to work with your
forms. You'll also find an easy-to-follow tutorial exercise (Test Drive LabelWiz) for printing a few labels using the included
Customers database and sample labels. This tutorial takes just a few minutes to
complete and rapidly familiarizes you with how LabelWiz
works.
- Test Print — Click this button to print a sample label
that represents your design specifications so far. Use this button
as often as needed to check your label design and alignment. It
will prompt you to enter some realistic data and will then print a
label in the first label position on the page. Test your label
designs by printing to plain paper.
The Label Settings tab
Import Label
The Import Label button displays a picklist of predefined Avery label templates,
including their product number, labels per sheet, rows and
columns, label width and height, column gap and top and
left margins. When you select a label sheet, you're prompted to import its specs
into the current record. If you say 'Yes' and there are already specs in the record (on
the Label Settings tab) they will be overwritten. Any data on any of the other
tabs will not be affected.
You can always enter your label specs manually, and make small adjustments to them
to accommodate your particular printer. Information on measuring
your labels is on the Measuring tab.
Import
Old LabelWiz Records
This button imports your label definitions from an earlier (original) version of LabelWiz. After running this
procedure, you'll be prompted to F10 through the imported records
in order to upgrade them to the new LabelWizPro
format.
Cols, Rows, Labels per Sheet
Select the number of columns and rows for the label sheet you're
defining. The Labels per Sheet field will then show the number of labels on the
sheet.
Label Width, Label Height, Column
Gap, Top/Left Margins
These settings must be accurate for the label you're using. You can measure these
using a good ruler with small divisions, but you're better off getting the settings
from a label maker or by using LabelWiz's Import Label button. The following
site has a cross-reference chart for the most popular Avery label sheets.
http://www.worldlabel.com/Pages/pageaverylabels.htm
Find the Avery label number you're using on the chart, click the Click here to
view button, then click the Click here for dimensions link. Use the
dimensions shown when defining your label. Round all numbers to
three
decimal places.
Small adjustments to the above settings can get your label sheets to print
precisely to most any sheet-fed printer. All printers are not created equal. Some
have slightly larger or smaller "no-print" margins, some feed the sheets so that
printing starts a little closer to or farther away from the sheet edge. LabelWiz
provides a little extra "breathing room" so that anything you print
has a good chance of printing inside the label's die cut.
A4
Paper (International)
Check this box if you're printing to A4
label sheets. This tells LabelWiz to adjust for a
sheet size that's 8¼ x 11¾ inches
(210mm x 297mm).
Label Notes
Use this field for any notes or reminders
you may want to save about this particular label, such as which
form it's for use with, which printer to print to, and so forth.
Check the Show notes when using this label checkbox if
you want the notes to display when this label is selected for
printing. (The notes don't display when printing directly from
LabelWiz.)
Printing Tips
- Test print on a plain sheet of paper.
- Hold the printed sheet squarely behind the label sheet and hold them both up
to bright light to check the alignment of your layout. Slight adjustments to the
layout may be necessary.
- If the labels "creep" down the sheet, decrease the label
height a bit. If the labels creep up the sheet, increase the
label height a bit.
- If the entire sheet is slightly misaligned, adjust the top and/or
left margins slightly.
- When satisfied with the layout, print onto the label sheets.
Technical note: LabelWiz prints
each page of labels as a "separate job." For this reason, you're
not likely to experience the kind of "label creep" you can get
with other products where the "creep" becomes increasingly
severe as each sheet is printed. LabelWiz avoids
this by
"starting over" with each individual label sheet.
The Merge Fields tab
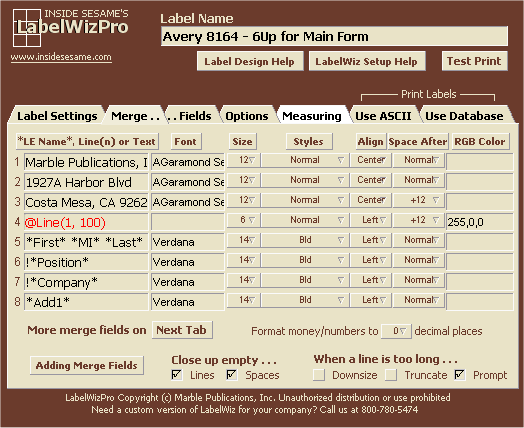
The first Merge Fields tab (label lines 1 through 8)
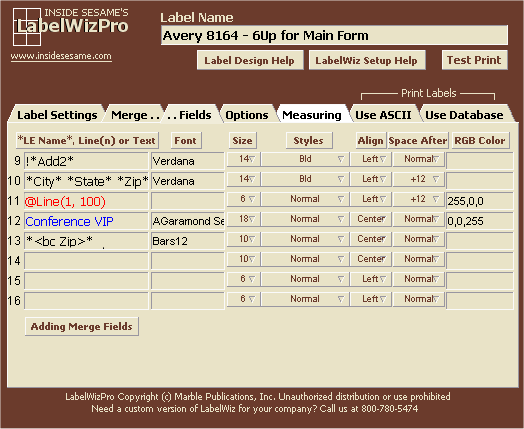
The second Merge Fields tab (label lines 9 through 16)
LE Names,
Text, Lines
Type your layout element names in the fields provided. If the
element name on your form is First Name, then type in *First Name*.
If you have elements named First Name and Last Name, and you want them to print on one line, type:
*First Name* *Last Name*
All merge fields must be enclosed in asterisks.
To print a line of literal text, simply type it without asterisks,
as in this example:
To Be Opened by Addressee Only!
You can place literal text and merge fields on the same line, as
in this example:
Name: *FName* *MI* *LName*
Company: *Company*
or, as in this example:
To be opened by *FirstName* *LastName* only!
To have LabelWiz collapse the line if the sole
merge field on that line is blank when printed, precede the line
with an exclamation point, like this:
!*Address2*
Note: To optionally have LabelWiz
automatically close up all blank lines, be sure the
Close Up Empty Lines checkbox is checked. (See below.) If not checked, then LabelWiz
will collapse a blank line only if the merge field is preceded by a
"!".
Important:
NEVER use a ";" (semicolon) character anywhere.
NEVER use an "*" (asterisk) character anywhere except to denote a merge
field.
NEVER use a "+" (plus) sign anywhere except to force manual
spacing, such as between a state and ZIPCode
The above are LabelWiz reserved characters. If any of the merged data
or literal label text includes any of them, you can get unexpected results.
Printing Solid Graphic Lines
To print a solid line, type the @Line(Thickness, Length)
command on the label line.
Thickness — an integer representing the line's
thickness, such as 1 or 3 or 10.
Length — an integer representing the line's length as
a percentage of the label's width. For example, to make the line
50% of the label's width, specify 50 as the length
parameter.
The following examples print a solid line
in various thicknesses and lengths:
| @Line(1, 100) |
|
| @Line(2, 100) |
|
| @Line(3, 50) |
|
| @Line(4, 25) |
|
| @Line(9, 50) (centered) |
|
- You can align a line left, center or right,
just as you can align merge fields and text.
- You can RGB Color the line to print it in the color of
your choice.
- You can add vertical space after the line.
- Font, Font Size and Styles have no
affect on graphic lines.
Adding a Barcode
To add a barcode to a label, type it on the label line in this
format:
*<bc Zip>*
Then, in the adjacent Font and Size fields, type
the name of the barcode font and select the font size. (A size of 14 is
about right for a PostNet barcode.) You must have the specified
barcode font installed in your system.
The example above tells LabelWiz to apply the
specified barcode font and size to the data in the Zip field
and print the barcode on this label line.
Barcode fonts typically require a special character to delimit
the start and end of the data to be barcoded. Some barcode fonts
use a "/" or a "*" character for this. When specifying a barcode,
be sure to enter this special character in the Barcode Delimiter
Character field on the label Options tab.
If the barcoded value is alphanumeric (as opposed to strictly
numeric as a PostNet barcode), check the Leave non-digits in
barcoded strings checkbox.
For a PostNet barcode, you can download and install the "bars12" font
from
http://www.savepostage.com.
PostNet barcodes are supposed to speed mail delivery, but they're really only useful with ZIP+4 (9-digit) ZIP
Codes, preferably with the carrier route added.
Font
Type in the font name as it exists on your PC. You
must spell the font name exactly right or LabelWiz
will use your PC's default font. Here are some typical font name
examples:
Arial
Arial Narrow
Arial Black
Verdana
Times New Roman
Lucida Sans
Courier New
If you do not specify a font, LabelWiz will
use your PC's default font. If you have a word processor such as
Microsoft Word, you can use it to see what fonts you have, the
exact names of those fonts, and what
they look like at various sizes.
Font Size
Select the font size from the dropdown. LabelWiz
supports font sizes from 6 to 40.
Font
Style
Optionally select text enhancements from the dropdown.
You can choose bold (Bld), italic (Ital),
underline (Und) and ALL CAPITALS (Caps) or any combination of
these. Use the default "Normal" style for regular text.
Space
Optionally select the line spacing
from the dropdown. This is the amount of space you want added or
subtracted after
the current line. To print the next line closer to the current
line, choose a number preceded by a minus (-) sign. To add more
space between the current line and the next line, choose a number
preceded by a plus (+) sign.
Alignment
Optionally select the type of text alignment from the
dropdown. Align left is the default. You can also align center or right.
Color
Optionally enter the RGB (Red, Green, Blue) value for
the color in which to print the label line. This value
must be entered in a strict format. For example, the following will
print the line in a bright orange, assuming you use a color
printer:
255,157,0
You can use Sesame Designer's custom color mixer to find the RGB
values for the colors you like. Jot down their RGB values on a
sheet of paper, then type them into the appropriate LabelWiz
fields. The following web page shows hundreds of colors and their
RGB values:
http://www.pitt.edu/~nisg/cis/web/cgi/rgb.html
As you design your label, use the Test Print
button to see how it will look when printed.
Note: If you're defining a label for use with several applications that have different
layout element names, or with one application that has multiple forms with different
layout element names, then you will need to create a Label record for each such
form. Take care that such records do not have the same Label Name
because
LabelWiz will find the first label with that name and use it
— and it might
not be the label you wanted.
Close Up
Empty Lines
When this box is checked, LabelWiz will
close up any vertical space on the label left by merge
fields that are blank. (See sample below.) This box is checked by
default. If you want LabelWiz to leave blank lines in
the label when the merge fields are empty, uncheck this box.
If you want LabelWiz to close up only certain
label lines when blank, precede the merge field on those lines with an "!"
and leave Close Up Empty Lines unchecked.
Close Up
Empty Spaces
When this box is checked, LabelWiz will
close up any contiguous horizontal space (multiple spaces) on a label line left by merge
fields that are blank. (See sample below.) A blank merge field
positioned between two non-blank merge fields would normally leave
two spaces — one on either side of the blank merge field. This
setting collapses those two spaces into one. This box is checked by
default. If you want LabelWiz to leave extra spaces
in the label left by blank merge fields, uncheck this box.
|
Merge fields |
Sample Values |
Not Closed Up |
Closed Up |
*First* *MI*
*Last*
*Company*
*Address1*
*Address2*
*City* *State* *Zip* |
Bob [blank]
Jones
[blank]
211 Elm St.
[blank]
Laguna CA 92456 |
Bob Jones
211 Elm St.
Laguna CA 92456 |
Bob Jones
211 Elm St.
Laguna CA 92465 |
Using "+" to force additional space
If you want to maintain additional spacing between certain label
elements, such as between a state and ZIP code, use "+" signs
instead of spaces. Close Up Empty Spaces will then respect your
manual spacing.
You can also place one or more "+" signs at the beginning of any
line to indent it. For example, typing "+++" at the beginning of any
line will indent that line by three spaces.
Be careful when using "+" on a "!" line that will be closed up if
blank. In this case, you must type the "+" signs after the "!", like this:
!++++*Address2*
Downsize
Lines that are Too Long
When this box is checked, LabelWiz
reduces the font size of an overly long line by 1 point increments until
it is able to make the line fit the label width.
Truncate
Lines that are Too Long
When this box is checked, LabelWiz
truncates an overly long line one character at a time until it is able to make the
line fit the label width.
Prompt for
Lines that are Too Long
When this box is checked, LabelWiz
prompts you to edit an overly long line until
it fits the label width. This happens in real time, as the labels are
being printed.
Note: If none of the three boxes (Downsize,
Truncate, Prompt) is
checked, any lines too long to fit the label width will wrap and
obscure some or all of the text on the subsequent label line.
Note: If you are printing a frame on your label (See
The Options tab below), LabelWiz does its
best to place all text inside the frame. Because the right edge of the
frame must be within the printable margin in the rightmost column,
LabelWiz has to reduce the label width slightly.
Therefore, the above methods to shorten lines that are too long might
not work as well on a framed label.
The Options tab
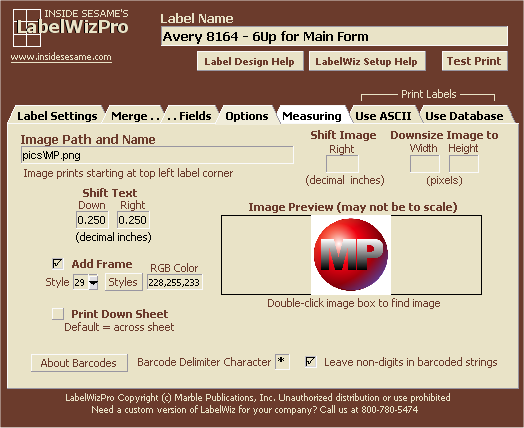
The Label Options tab
Your label options are as follows:
- Image Path and Name — Specify an image to print on the label.
LabelWizPro's default image path — as set at the
Application Property Manager screen — is the pics
folder. (You're free to change this.) Assuming the image you want
to include on your label is in that folder in your working Sesame
directory, you can type in the relative path
to your image file (such as pics/mylogo.jpg) in this field.
When you move out of the field, if the image exists, it will appear in the Image Preview box, scaled to fit the box's
dimensions. (This will not likely be the image's actual size.)
You can optionally
double-click on the Image Preview box and select the image from your file system
that way. If you're going to be using images in your labels, and
you have them stored elsewhere than the pics folder, you should go into
Application Property Manager in Designer and specify the path
to them.
The image file must be a BMP, non-progressive JPG or PNG. The image will print at 100% unless you
specify the Width and Height. (See Downsize Image below.)
Images
can be resized/resampled in most any graphics program. Suppose your image is 3 inches
wide by 1 inch high and you're printing to Avery 8164 shipping labels (4 inches wide by
3.33 inches high). Any image you specify will print starting in the upper left corner
of the label. If you Shift (see below) your label text Down by 1.5 and
Right by .50, the address block will print below the image with plenty of white
space around it.
- Shift Image Right — Enter the amount, in decimal inches,
to shift the image to the right. LabelWiz normally
prints an image at the top left corner of the label. This setting
lets you slide the image over to the right. To center the image at
the top of the label, for example, divide the label width by 2,
then subtract half the image width from it.
- Downsize Image — Image Width & Height. You can specify the Width and
Height of the selected image. These settings are useful if you need to scale the
image down a bit to fit on the label after performing a Test Print.
Scaling an
image (called resizing or resampling) is best done in a
real graphics program
such as Photoshop, Paint Shop, PhotoPaint or Microsoft Paint (on the Accessories menu
in Windows), but you can do it in LabelWiz to see the
effect of the scaling. You cannot scale an image upward (increasing its size), only
downward. You can use Test Print to see the effects of your image sizing.
Note: If you specify a Width setting and leave the Height setting
blank, LabelWiz will maintain the image's correct width-to-height aspect
ratio for the reduced width you specified.
Note: For larger labels such as shipping labels, you can
create and use an image file of your company's logo, name and
address, and tell LabelWiz to use that image on your
labels. Ideally, you'd create the image at a width
slightly smaller than the label width. You can then shift your text
down (see below) to start printing your text below the image. Keep
in mind that
LabelWiz prints at 1,000 dpi (dots per inch). So if the
label's width is 4 inches, you'd want your image's width to be
about 3½
inches or thereabouts at 1000 dpi/pixel resolution (or 17½ inches
at 200 dpi/pixel resolution). If you need
help sizing your image, send us the image file by email attachment
(office@insidesesame.com)
and tell us the dimensions of the label you want to use it on.
- Shift Text — Shift the label text down and/or to the right. This feature
provides an offset for the label address block, such as when printing addresses on
large shipping labels. Use this feature to shift the text down and over to the right so
it prints more in the center of the label. Shift Text is particularly useful on
larger labels, such as the Avery 8164. This label is 4 inches wide by 3.33 inches high.
If you shift the text 1.25 Down and 1.00 Right, a typical address block will print
close to the center of the label.
No
Shift Text |
|
Shift
Text
Down &
Right |
|
|
|
|
Shift Text is required if you're including an image on your label, such as a
company logo, or using a Label Frame (see below). The image will print
starting in the upper left corner of the label, so you'll need to Shift your
address block to print below that and perhaps a bit over to the right. With a
frame, you'll need to shift the text down and to the right a bit so it doesn't
print on the frame border.
You can also use small Shift Text settings to compensate for the
variations that all printers have as to where they actually put the ink on the
paper.
- Add Label Frame. This feature prints a frame around the perimeter of
the label, 1/8th to 1/4 of an inch in. You can optionally use this for larger labels where you know you have enough
"white space" around the outside of the label. Do not
use a label frame for
small 3-across labels such as the Avery 5160 as they have barely enough
room as they are to print an address block. Click the Pick button to select a frame
style from a popup list. Click the Styles button to print
out a page that shows all the frame and box types. You can then print a sample of the frame style to your default
printer by clicking the Test Print button.
Note: When using a Frame with right-aligned text,
LabelWiz does it's best to keep the end of the line
inside the frame. To do this, it must reduce the label width by a
small amount.
- Print Down. This feature prints your labels down the page in a
phonebook-like "snaking column" format (right-hand graphic below) rather than across
the page (the default). If you sort your records before printing the labels (always a
good idea in case you experience a jam or didn't provide enough label sheets and have
to reprint) then the sort order will go down the first column and continue at the top
of the next column.
Print
Across
Sheet
(default) |
|
Print
Down
Sheet
|
|
1 |
2 |
|
1 |
4 |
|
3 |
4 |
2 |
5 |
|
5 |
6 |
3 |
6 |
- Barcode Delimiter Character. Type in the start/end
delimiter character for the barcode font you're using. For the "bars12"
font that character is the / (slash) character. Some barcode
fonts use the * character instead. You must have the barcode
font installed in your system. If you don't,
then your labels will print with something like this for a barcoded
Zip field:
/926271275/
- Leave non-digits in barcoded strings. Leave this box
unchecked for a PostNet barcode, because you want the dash in a
Zip+4 Zip Code (92627-1275, for example) stripped out. If you're
using a barcode font that supports characters other than digits,
and your data contains other than digits, then check this box and
LabelWiz will barcode the data as it is.
The Measuring tab
The Measuring tab
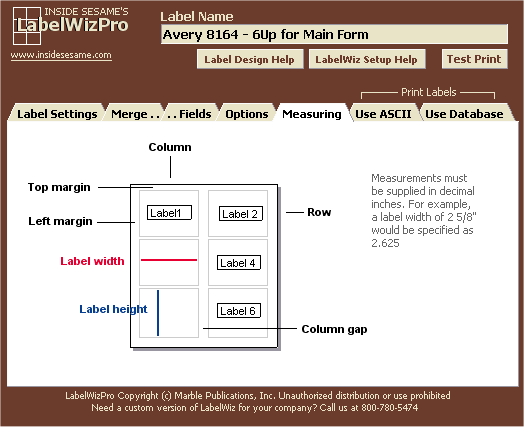
LabelWiz's Measuring tab shows
you how to measure a label sheet to get the specifications for the Label
Settings tab. You won't need this tab when importing a predefined
label template. For a custom label sheet, measure using a good ruler
with small 1/16th-inch divisions. If for example, the label width
measures 2 5/8 inches, divide the 5 by the 8 on a calculator to
get .625 and add this to the 2 to get 2.625
decimal inches. This is the value you use for Label Width on
the Label Settings tab.
The Use ASCII tab
The Use ASCII tab
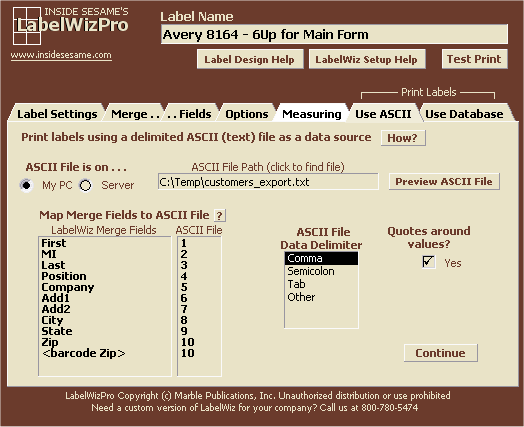
LabelWiz can use a
delimited ASCII (text file) for label printing. This is a powerful
option because it is form-independent, allowing you to print
labels for data that comes from virtually any source, not just
a Sesame database.
You can use most any kind of ASCII file as long as each record in
the file ends with a carriage return and the data values are delimited
in some way.
All settings, specs and options in the current LabelWiz
record will be applied to the printed labels.
When printing labels from an ASCII file, you must map the LabelWiz
merge fields to the corresponding field/column in the ASCII file. To
do this, click on the LabelWiz Merge Fields box. It will
fill with the LabelWiz merge field names. In
the adjacent ASCII Fields box, type in the ASCII file's
field/column numbers that correspond to the merge field names.
For example, if the City merge field is on the 8th line of
LabelWiz Merge Fields box, but it's the 4th field in the ASCII
file, type 4 on the corresponding line of the ASCII Fields
box. This maps the 4th field/column in the ASCII file to the
City merge field, as shown in the example below.
LabelWiz
Merge Fields |
Corresponding
ASCII File Fields |
First
MI
Last
Position
Company
Add1
Add2
City ----------->
State
Zip |
8
9
10
7
1
2
3
4
5
6 |
When printing labels from an ASCII file, LabelWiz
first counts the records, shows you a sample record from the ASCII
file, and asks for your okay before
continuing. It then lets you specify the starting label position on
the label sheet and the printer to print to.
Note: When you click on the ASCII File Path field to open the
ASCII file, the open file dialog will show a portion of the file you
select. This gives you a chance to eyeball the file and
confirm that your LabelWiz settings are correct for it.
If still in doubt, you can click the Preview ASCII File button
to display the entire file.
When creating an export file in Sesame (or any other product), sort the records first. This way, if printing is
interrupted because of a jam or other problem, you can re-create the
export file, omitting the records that printed okay, then print the
remaining ones.
When exporting from a Sesame database for LabelWiz,
do not include a "header row" of field names. Just
use Sesame's
default export specs,
then you can tell LabelWiz to use comma as the
delimiter with quotes around values.
Note: If using a barcode with an ASCII file, be sure to
correctly map the barcode merge field to the field/column where the
data to be barcoded appears in the ASCII file, as shown in this
example:
Zip
8
<bc Zip> 8
The Use Database tab
The Use Database tab
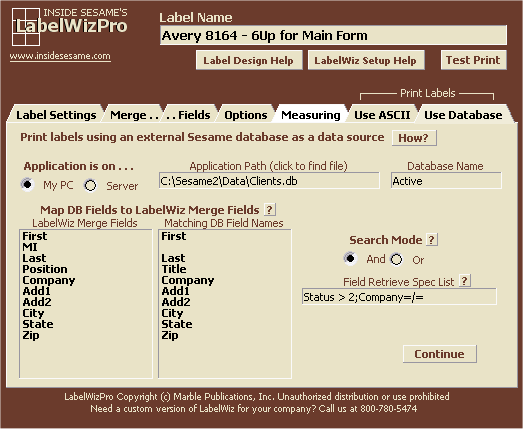
LabelWiz can use an external Sesame
database for label printing. This powerful
option is form-independent, allowing you to print
labels for records in any database in any Sesame application.
LabelWiz uses Sesame 2.0's XResultSet
technology for this option, which is covered in the Sesame 2.0
Programming Guide. The key things here are:
- You must know the name of the database in the
Sesame application that you want to use. This is often the same as
the form name, but not always. (In the sample Customers
application that comes with Sesame, the form is named Main
Form but the database is named Customers. So it's
Customers that you'd type in the Database Name
field) The Application menu tree shows the names of the databases it
contains along with the form names linked to it. The database name
always comes first on the tree. That's what LabelWiz
needs to know — the database name.
- You must also know the names of the fields in the
database that you want LabelWiz to use. These are
not the form layout element names or their labels. They are the
database field names, which may not be named the same. If you
go into Sesame Designer, you can use the form to tell you the
database field names. Open the form, click on a layout element, then
click on the Other tab of the Property Viewer. You'll
see the Bound To field name with a "!" in front of it. That's
the name LabelWiz wants, without the "!" in front of
it.
When you know the database field names, you can then map them to the
LabelWiz merge fields. Click on the LabelWiz Merge
Fields box and LabelWiz will fill it with the
merge field names as shown on the Merge Fields tab.
Then, in the right-hand Matching DB Field Names box, type
in the database field names that correspond, line to line, to the
ones in the left-hand box.
Here's an example of what the two boxes might look like when
you're finished:
LabelWiz
Merge Fields |
Corresponding
Database Field Names |
First
MI
Last
Position
Company
Add1
Add2
City
State
Zip |
First Name
Init
Last Name
Title
Company
Address
Address2
City
State
ZipCode |
The database field names in the right-hand box must correspond,
line to line, to the LabelWiz merge field names in the left-hand box.
For the Search Mode, select an And search or an
Or search. This setting corresponds to the Field Retrieve Spec
List field just below it, where you type in your record selection
criteria. If there are multiple criteria, an And search finds
the records that meet ALL the criteria, whereas an OR search
finds the records that meet ANY of the criteria.
If you don't supply a Field Retrieve Spec List, LabelWiz
will include ALL the records in the named database.
Here are a some examples of Field Retrieve Spec Lists:
!Company=m.. selects the records where the Company
field begins with M.
!Company=/= selects the records where the Company
field isn't blank.
!Status== selects the records where the Status field is
empty.
In an AND search,
!Company=/=,!Address=/=,!City=/=,!State=/=,!Zip=/=
selects the
records where each of the five named fields has something in it.
In an OR search, !Status==;VIP selects the records where the
Status field is blank or contains VIP.
Consult the Sesame 2.0 Programming Guide under
@XResultSetSearch for other examples.
When you click on the Continue button, assuming the lookup
is successful, you'll be prompted to supply your sorting criteria. You
can sort ascending or descending on up to three fields. LabelWiz
then displays the data from the first record in the result set,
giving you a chance to make sure your specs look right before
proceeding.
Note: If using a barcode with a database file, be sure to
correctly map the barcode merge field to corresponding field in the
database file, as shown in this example:
Zip
Zip
<bc Zip> Zip
Stopping
a Label Print Job
If you've started a label printing job and
realize you've made a mistake, you can press Ctrl-Shift-End to
terminate the printing loop. This does not prevent label
sheets already sent to your operating
system/printer from trying to
print. The only way to stop the printing is to stop label sheets from being fed.
For this you can
pull out the paper tray containing the label sheets. (Don't ever just
turn off the printer.) You can then cancel the print job
in Windows then safely turn the printer off to clear its print buffer.
Label Page Print Preview
Previewing the first page of a sheet of labels before wasting paper is always a good idea.
LabelWiz lets you select any available printer to print to. By
default, the printer menu includes only your default printer, but you can add to the menu
any printer in your system or a shared printer on your network. A good "printer" for previewing the first page of a label
print job is PDF995. For $10.00 you can download PDF995 at http://www.pdf995.com. Once you've installed it in your
system, you will have a new printer named "PDF995" which you can add to your
LabelWiz printer menu
via the Add Printer menu selection. You will need Adobe Acrobat Reader on your
computer if you use PDF995. Adobe Reader is available free at http://www.adobe.com.
Note: PDF995 will display only the first page of labels for a print job.
Do not use a printed copy of a PDF995-generated PDF file to check
label alignment as such a document isn't likely to have the same page
margins as a label sheet printed directly from LabelWizPro.
If you need technical assistance for LabelWizPro, contact us at
office@insidesesame.com. We may ask you to send us the application you're using to
print labels so we can determine the cause of the problem.
For LabelWiz setup instructions,
click the LabelWiz Setup button
near the top of the LabelWiz form. |


